Windows 7 Desktop - The Elements of Windows Seven Desktop


When you first starting up you will see the Windows 7 desktop or a Welcome screen once you loaded into the desktop environment.

Normally the desktop contains start button, taskbar, windows, icons, gadgets, files, and programs. You can use the desktop to access, store, organize, modify, share, and explore information, whether it resides on your computer, a network, a HomeGroup or the Internet.

The following shows the main screen of the Windows desktop environments.

Windows 7 desktop elements

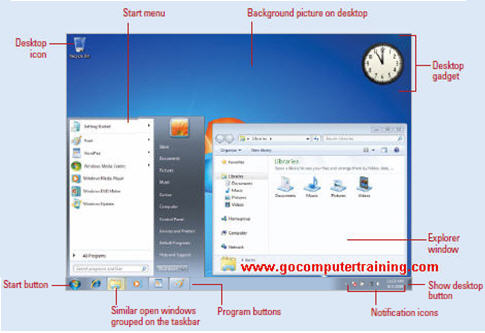
When you are in the Windows 7 desktop, the following are the desktop elements:

The Start button

  • Provides a launch point for all commands and applications on your system.
  • Can use to quickly start a program, find and open files, access the Windows Help and Support Center, shut down computer, etc.


The Taskbar

  • Positioned at the bottom of the screen.
  • It contains Start button, Program or Taskbar Buttons, icons for each running application, the Notification Icons and show desktop button.

For more information about the Windows 7 taskbar, visit this tutorial.


Desktop icon

  • Provides quick access to specific program. By default, Windows 7 show the Recycle Bin icon. However, you can add or remove frequently used program icons to the desktop.


Gadget

  • Allow you to quickly access various handy features from your computer desktop such as Internet radio, slide show, traffic maps, feed online data direct to your desktop, and more.
  • By default, you don't see any gadget appears on the desktop. You can add, change, move or close the gadgets from the desktop as describes here.


Working on the Windows 7 Desktop

To create a desktop shortcut

  • Choose Start, point to All Programs and locate the program on the list of programs that you wish to make a shortcut to the desktop.
  • Windows 7 desktop shortcut

  • Right-click on that program, and point to Send To and click on Desktop (create shortcut).
  • The shortcut appears on the desktop. Double-click the icon to open the application.


To arrange icons on the desktop

  • Right-click the desktop and choose View from the shortcut menu; be sure that Auto Arrange option isn't selected.
  • To arrange desktop icons manually, just click any icon and drag it to another location.
  • Alternatively, you can right-click the Windows 7 desktop and from the shortcut menu, choose Sort By and then click the criteria for sorting your desktop shortcuts.
  • Windows 7 sort desktop icons

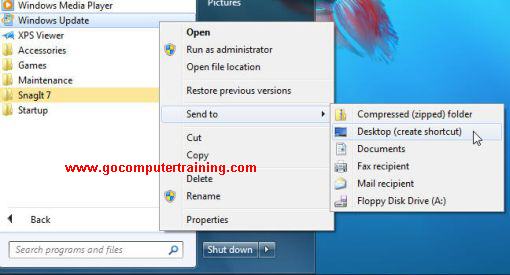
Note: To arrange icons on the Windows 7 desktop, you need to place few icons on the desktop only you will see the effects.


Can't find what you're looking for? Try Google Search!

Custom Search


Back to Top

You're viewing the Windows 7 desktop info page, click here to go back to the Home Page


Google Search:

Custom Search

Windows 7 Video Training DVD


Free Newsletter

Get your free subscription below to download two ebooks and improves your computer skills or click here for details.

Enter your Email

Enter your First Name

Then

Don't worry -- your e-mail address is totally secure. I promise to use it only to send you Computer Tips.


Windows 7 Upgrade


Windows 7 Full Version


Enjoy This Site?
Then why not use the button below, to add us to your favorite bookmarking service?


| Home | Computer Hardware | Install Windows | Vista Training | Windows 7 Tutorials |
| FREE E-books | Office 2007 | Office 2003 | Internet & E-mailing | Sitemap |
| Computer Networking | Windows Registry | Backup Data & Recovery | Computer Security |


Microsoft Windows 7, Vista, XP, Microsoft Office Word, Excel, PowerPoint,
and Outlook are either registered trademarks or trademarks of
Microsoft Corporation in the United States and/or other countries.


Return to Top | Privacy Policy | Disclaimer | Terms of Use

Copyright © www.GoComputerTraining.com. All Rights Reserved.